")


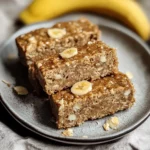
It started, as many kitchen adventures do, with a bunch of overripe bananas staring mournfully at me from the fruit bowl. My kids, notorious for their love-hate relationship with bananas (they adore them until the slightest brown spot appears), had declared them “too mushy.” I hate food waste, and my mind immediately went to banana bread, but I wanted something quicker, something grab-and-go for our busy mornings and after-school activities. That’s when the idea for Banana Cinnamon Energy Bars sparked. I’d experimented with energy balls before, but bars felt more substantial. I wanted something packed with wholesome ingredients, naturally sweetened, and with that comforting warmth of cinnamon. The first batch was good, but a little crumbly. After a few tweaks – adjusting the binder, getting the banana-to-oats ratio just right, and ensuring they were pressed firmly – magic happened. These Banana Cinnamon Energy Bars became an instant hit! My husband grabs one before his morning run, the kids devour them as an after-school snack (sometimes with a sneaky layer of peanut butter on top), and I love having a healthy, satisfying treat on hand that doesn’t come with a side of guilt. They are chewy, flavorful, and provide a genuine energy boost without the dreaded sugar crash. They’ve become a staple in our household, and I’m so excited to share this recipe with you.
Ingredients
- Rolled Oats (Old-Fashioned): 2 cups (200g) – The backbone of our bars, providing sustained energy, fiber, and a delightful chewy texture. Do not use instant oats, as they will result in a mushier texture.
- Ripe Bananas: 2 large (about 1 cup mashed, or 240g) – The star flavor and natural sweetener. The riper, the better, as they are sweeter and easier to mash.
- Medjool Dates: 1 cup, pitted (about 12-15 dates, or 175g) – These provide natural sweetness, act as a fantastic binder, and contribute a lovely caramel-like flavor. If your dates are dry, soak them in hot water for 10 minutes, then drain.
- Nut Butter: 1/2 cup (128g) – Almond butter, peanut butter, or cashew butter work wonderfully. Choose an unsweetened, natural variety. This adds healthy fats, protein, and helps bind the bars.
- Chopped Nuts: 1/2 cup (60g) – Walnuts, pecans, or almonds add a lovely crunch and more healthy fats. Toast them lightly for enhanced flavor if desired.
- Ground Cinnamon: 2 teaspoons – The warming spice that perfectly complements the banana and adds a touch of cozy. Feel free to adjust to your taste.
- Chia Seeds or Ground Flaxseed: 2 tablespoons – For an extra boost of fiber, omega-3s, and to help with binding.
- Vanilla Extract: 1 teaspoon – Enhances all the other flavors in the bars.
- Pinch of Salt: 1/4 teaspoon – Balances the sweetness and brings out the flavors.
Instructions
- Prepare the Pan: Line an 8×8 inch (20×20 cm) square baking pan with parchment paper, leaving some overhang on the sides to easily lift the bars out later. This step is crucial for easy removal and cutting.
- Process the Dates: If your Medjool dates are not already soft, soak them in hot water for 10-15 minutes. Drain them well. Add the pitted dates to a food processor and pulse until they form a sticky paste or are finely chopped. Scrape down the sides as needed.
- Mash the Bananas: In a large mixing bowl, thoroughly mash the ripe bananas with a fork until mostly smooth. A few small lumps are okay.
- Combine Wet Ingredients: To the mashed bananas, add the processed date paste, nut butter, and vanilla extract. Stir well until everything is thoroughly combined and smooth.
- Add Dry Ingredients: To the wet mixture, add the rolled oats, chopped nuts, ground cinnamon, chia seeds (or ground flaxseed), and salt.
- Mix Thoroughly: Using a sturdy spatula or your hands (it can get a bit sticky!), mix all the ingredients together until everything is evenly distributed and a cohesive, sticky dough forms. Ensure there are no dry patches of oats.
- Press into Pan: Transfer the mixture to the prepared baking pan. Spread it out evenly. Then, using the back of a spoon, your hands (dampen them slightly to prevent sticking), or another piece of parchment paper on top, press the mixture down very firmly and evenly into the pan. This is key to ensuring the bars hold together well. Aim for a compact, level surface.
- Chill: Cover the pan with plastic wrap or foil and refrigerate for at least 2 hours, or preferably 4 hours (or even overnight). This allows the bars to firm up, making them much easier to cut.
- Cut and Store: Once chilled and firm, use the parchment paper overhang to lift the block out of the pan onto a cutting board. Using a sharp knife, cut into 12-16 bars or squares, depending on your desired size.
- Enjoy: Your delicious homemade Banana Cinnamon Energy Bars are ready to be enjoyed!
Nutrition Facts
- Servings: This recipe makes approximately 12-16 bars, depending on how you cut them.
- Calories per serving (approximate, for 1 of 16 bars): 150-180 calories.
- Fiber: Rich in dietary fiber from oats, bananas, dates, nuts, and seeds, aiding digestion and promoting satiety.
- Healthy Fats: Contains monounsaturated and polyunsaturated fats from nut butter and nuts, essential for brain health and sustained energy.
- Natural Sugars: Primarily sweetened with natural sugars from bananas and dates, providing quick energy without refined sugar spikes.
- Potassium: Bananas are a good source of potassium, important for heart health and muscle function.
- Complex Carbohydrates: Oats provide complex carbohydrates, which release energy slowly, keeping you fueled for longer.
Preparation Time
- Active Preparation Time: Approximately 20-25 minutes. This includes gathering ingredients, processing dates, mashing bananas, mixing, and pressing into the pan.
- Chilling Time: Minimum 2 hours, preferably 4 hours or overnight. This is crucial for the bars to set properly before cutting.
- Total Time (excluding extended chilling): Approximately 2 hours 25 minutes.
How to Serve
These Banana Cinnamon Energy Bars are incredibly versatile! Here are some ways to enjoy them:
- Quick Breakfast:
- Grab one on your way out the door for a speedy and nutritious start to your day.
- Pair with a piece of fruit and a cup of coffee or tea for a more complete breakfast.
- Pre-Workout Fuel:
- Eat a bar 30-60 minutes before exercise for a sustained energy release.
- Post-Workout Recovery:
- Enjoy as a snack after your workout to help replenish glycogen stores and provide some protein for muscle repair.
- Afternoon Pick-Me-Up:
- Beat the mid-afternoon slump with a healthy and satisfying bar instead of reaching for sugary snacks.
- Perfect with a glass of milk or a herbal tea.
- School or Work Snack:
- Pack them in lunchboxes for kids or take them to work for a convenient and healthy snack.
- Hiking or Travel Snack:
- Their portable nature makes them ideal for taking on hikes, road trips, or any outdoor adventure.
- With a Topping:
- Spread a thin layer of extra nut butter on top.
- Drizzle with a little melted dark chocolate for an indulgent treat.
- Sprinkle with a few extra toasted coconut flakes or mini chocolate chips before chilling.
- Crumble Over Yogurt:
- Break a bar into pieces and use it as a topping for Greek yogurt or a smoothie bowl for added texture and flavor.
Additional Tips
Ripe Bananas are Key
When it comes to making delicious and moist bars, the ripeness of your bananas plays a crucial role. Opt for bananas that are heavily speckled with brown spots and feel soft to the touch. These overripe bananas are not only sweeter than their yellow counterparts but also contribute significantly to the overall flavor and moisture of your bars. The natural sugars in ripe bananas caramelize during the baking process, enhancing the sweetness without the need for additional sweeteners. Furthermore, the soft texture of ripe bananas allows for easier mashing, which is essential for seamlessly incorporating them into your mixture. This will lead to a smoother batter, ensuring that every bite of your bars is soft, flavorful, and satisfying.
Date Check
Medjool dates are a fantastic natural sweetener that adds a rich, caramel-like flavor to your bars. However, if your Medjool dates are on the drier side, they can be difficult to blend into a smooth paste. This is where soaking becomes critical. By soaking your dates in hot water for 10-15 minutes, you allow them to absorb moisture, making them pliable and easier to process. Not only does this step facilitate a smoother blend, but it also integrates the sweetness more evenly throughout the mixture. After soaking, be sure to drain the dates well before adding them to your other ingredients to prevent excess water from altering the consistency of your bars.
Press Firmly
The importance of pressing your mixture firmly into the pan cannot be overstated. A well-compressed mixture is essential for the structural integrity of your bars. When the mixture is densely packed, it helps the ingredients meld together, preventing the bars from crumbling apart once they have set. To achieve maximum pressure, utilize the bottom of a glass or a flat measuring cup, pressing evenly across the surface. This will create a cohesive and sturdy base, resulting in bars that hold their shape when cut and served. For an added touch, consider lining your pan with parchment paper before pressing in the mixture, as this will make it easier to lift the bars out after they’ve cooled.
Customize Your Nuts & Seeds
One of the most exciting aspects of making these bars is the ability to customize them to suit your taste preferences or dietary needs. While walnuts and pecans are delicious options, feel free to experiment with a variety of nuts or seeds. Almonds, cashews, and hazelnuts can provide different textures and flavors, while pumpkin seeds and sunflower seeds are excellent alternatives for those seeking a nut-free option. If you choose to go nut-free, also ensure that your nut butter is made from seeds (like sunflower seed butter) to maintain consistency in flavor and texture. This flexibility allows you to create a unique combination that caters to your palate or dietary restrictions.
Spice it Up
While cinnamon is a beloved classic that pairs beautifully with the flavors of bananas and dates, don’t hesitate to broaden your spice repertoire. A small pinch of nutmeg can introduce a cozy warmth, while cardamom adds a hint of exotic flair. Allspice offers a wonderful complexity that can elevate the overall profile of your bars. Feel free to get creative with your spice combinations—just remember that a little goes a long way, so start with small amounts and adjust to taste. This experimentation can turn a simple recipe into a signature creation that reflects your personal taste preferences.
Add-In Ideas
To elevate your bars further, consider incorporating additional ingredients that add flavor, texture, or visual appeal. A 1/4 cup of mini chocolate chips—whether dark, milk, or white—can provide a delightful sweetness and richness. Shredded unsweetened coconut adds chewiness and a hint of tropical flavor, making each bite more interesting. Dried fruits like cranberries or raisins not only contribute natural sweetness but also introduce chewiness that contrasts beautifully with the other textures. Get creative with these add-ins; you might discover a combination that quickly becomes a family favorite!
Storage Savvy
Proper storage is essential for keeping your bars fresh and delicious. After cutting them, place the bars in an airtight container and store them in the refrigerator, where they will remain good for up to one week. For those who want to extend the life of their bars, consider wrapping them individually in plastic wrap or parchment paper. This method not only helps maintain freshness but also makes them convenient for on-the-go snacking. Once wrapped, place the bars in a freezer-safe bag or container, where they can be stored for up to three months. When you’re ready to enjoy them, simply thaw the bars in the fridge overnight or allow them to sit at room temperature for a quick and easy snack.
Gluten-Free Option
For those with gluten sensitivities or celiac disease, making your bars gluten-free is a straightforward process. The primary ingredient to focus on is the rolled oats. Ensure that you use certified gluten-free rolled oats, as regular oats may be cross-contaminated with gluten during processing. All other ingredients in this recipe are naturally gluten-free, making it easy to create delicious bars that everyone can enjoy. By adhering to these guidelines, you’ll be able to serve a wholesome snack that caters to diverse dietary needs while still being incredibly tasty.
FAQ Section
- Q: Can I use quick oats or instant oats instead of rolled oats?
- A: It’s highly recommended to use rolled oats (old-fashioned oats) for the best texture. Quick oats can make the bars softer and mushier, while instant oats may not hold together as well and could result in a pasty texture.
- Q: My bars are too crumbly. What did I do wrong?
- A: Crumbliness can be due to a few factors: not enough binder (dates/nut butter), the mixture being too dry (perhaps your bananas were small), or not pressing the mixture firmly enough into the pan. Ensure you press down very well and chill sufficiently. You can also try adding an extra tablespoon or two of nut butter or a little more mashed banana next time.
- Q: Can I make these energy bars vegan?
- A: Yes! This recipe is naturally vegan as long as you ensure your optional add-ins (like chocolate chips) are also vegan. The core ingredients – oats, bananas, dates, nut butter, nuts, cinnamon, chia/flax, vanilla, salt – are all plant-based.
- Q: How long will these Banana Cinnamon Energy Bars last?
- A: Stored in an airtight container in the refrigerator, they will stay fresh for up to 1 week. For longer storage, you can freeze them for up to 3 months.
- Q: Can I substitute the Medjool dates with another sweetener?
- A: Medjool dates provide both sweetness and crucial binding power. While you could experiment with other sweeteners like maple syrup or honey (if not vegan), you might need to adjust other ingredients, perhaps adding more oats or chia/flax to compensate for the lost binding and bulk from the dates. The texture and flavor will also change.
- Q: Are these energy bars suitable for kids?
- A: Absolutely! They are made with wholesome, natural ingredients and are a much healthier alternative to many store-bought sugary snacks. They make a great addition to lunchboxes or as an after-school treat. Just be mindful of any nut allergies.
- Q: Can I double the recipe?
- A: Yes, you can easily double the recipe. Simply use a 9×13 inch (23×33 cm) baking pan instead of an 8×8 inch pan, and ensure you still press the mixture down very firmly. Chilling time may need to be slightly longer.
- Q: What if I don’t have a food processor for the dates?
- A: If you don’t have a food processor, you can finely chop the soaked and drained dates with a sharp knife. It will take more effort, but try to get them as close to a paste-like consistency as possible to ensure they mix well and bind the bars effectively. Alternatively, you can sometimes find date paste pre-made in stores.