")

I still remember the first time I made these Garlic Chicken Wrap Packs. It was one of those impossibly busy weeknights where the thought of cooking an elaborate meal, followed by a mountain of dishes, felt utterly defeating. I stumbled upon the concept of foil packet cooking and was intrigued by the promise of minimal cleanup and maximum flavor. Skeptical but desperate, I gathered some chicken, a head of garlic (we love garlic in our house), whatever veggies I had lingering in the crisper drawer, and some basic seasonings. The prep was surprisingly quick – mostly chopping and mixing. As the packets baked in the oven, the most incredible aroma of roasted garlic, chicken, and herbs filled the kitchen. My family, initially dubious about “dinner in a bag,” gathered around, drawn by the scent. When we carefully opened the steaming foil packets, revealing perfectly cooked, juicy chicken and tender-crisp vegetables bathed in a fragrant garlic sauce, it was love at first bite. We loaded up warm tortillas, added some cooling Greek yogurt and fresh cilantro, and devoured them. Even my pickiest eater asked for seconds! Since that night, these Garlic Chicken Wrap Packs have become a staple in our meal rotation. They are endlessly adaptable, incredibly easy, and the cleanup is genuinely a breeze – exactly what busy families need. It’s more than just a recipe; it’s a weeknight lifesaver that tastes like a weekend treat.
Ingredients
Here’s what you’ll need to create these delicious and convenient Garlic Chicken Wrap Packs. Each ingredient plays a vital role in building layers of flavor and texture.
- 1.5 lbs Boneless, Skinless Chicken Breasts: The lean protein base of our dish. Cut into uniform 1-inch cubes ensures even and quick cooking. You can also use chicken thighs for a richer flavor, though cooking time might need slight adjustment.
- 6-8 Cloves Fresh Garlic: The star of the show! Minced finely to release maximum aromatic flavor throughout the packets. Don’t skimp here; the garlic mellows beautifully as it roasts. Adjust amount based on your love for garlic – use less for a milder taste, more for a pungent kick.
- 1 Large Red Onion: Sliced thinly. Adds a touch of sweetness and depth as it cooks down. Yellow or white onions work well too.
- 1 Red Bell Pepper: Seeded and sliced. Provides vibrant color, a slight sweetness, and essential vitamins. Any color bell pepper (yellow, orange, green) can be substituted or added.
- 1 Green Bell Pepper: Seeded and sliced. Complements the red pepper with a slightly less sweet, earthier flavor profile.
- 1 Medium Zucchini: Sliced into half-moons (about 1/4-inch thick). Adds moisture, tenderness, and a dose of green goodness. Yellow squash is a great alternative.
- 1/4 Cup Olive Oil: Extra virgin recommended for flavor. This helps coat the chicken and vegetables, promotes browning, and prevents sticking.
- 1 tablespoon Dried Oregano: Adds a classic Mediterranean herbaceous note that pairs wonderfully with garlic and chicken.
- 1 teaspoon Smoked Paprika: Lends a subtle smokiness and beautiful color to the dish. Sweet paprika can be used if preferred.
- 1 teaspoon Salt (or to taste): Enhances all the other flavors. Start with one teaspoon and adjust as needed. Kosher salt or sea salt is recommended.
- 1/2 teaspoon Black Pepper (freshly ground preferred): Provides a gentle warmth and spice. Freshly ground pepper offers superior flavor.
- Large Flour Tortillas or Wraps (8-10 inch): For serving. Choose your favorite type – whole wheat, low-carb, gluten-free, or classic flour tortillas all work well. Warm them slightly before serving for better flexibility.
- Optional Garnishes: Fresh cilantro or parsley (chopped), sour cream or Greek yogurt, salsa, shredded cheese, avocado slices, lime wedges. These elevate the final wrap.
- Heavy-Duty Aluminum Foil: Essential for creating sturdy packets that won’t leak or tear easily during cooking or handling.
Instructions
Follow these steps carefully to ensure perfectly cooked, flavorful Garlic Chicken Wrap Packs every time. The beauty of this recipe lies in its simplicity and the steaming method within the foil.
- Preheat Oven & Prepare Foil: Preheat your oven to 400°F (200°C). If grilling, preheat your grill to medium heat (around 400°F). Tear off four large sheets of heavy-duty aluminum foil, each approximately 12×18 inches. Lay them flat on your work surface. Using heavy-duty foil is crucial to prevent tears and ensure a good seal, which traps the steam necessary for cooking. If using regular foil, consider double-layering each packet.
- Prepare the Chicken and Vegetables: Ensure your chicken breasts are cut into uniform 1-inch pieces. This consistency is key for even cooking, preventing some pieces from drying out while others are still undercooked. Chop the garlic finely (mincing it releases more flavor). Slice the red onion, red bell pepper, green bell pepper, and zucchini. Try to keep the vegetable slices relatively consistent in thickness so they cook at a similar rate.
- Combine Ingredients: In a large mixing bowl, combine the cubed chicken, minced garlic, sliced red onion, sliced bell peppers (both red and green), and sliced zucchini. Drizzle the olive oil over the chicken and vegetable mixture.
- Season Generously: Sprinkle the dried oregano, smoked paprika, salt, and freshly ground black pepper over the contents of the bowl.
- Toss to Coat: Using tongs or your clean hands, gently toss everything together until the chicken and vegetables are evenly coated with the olive oil and seasonings. Ensure every piece gets some love – this distribution is vital for balanced flavor in each packet. You can let this mixture sit for 10-15 minutes at room temperature (or longer in the fridge) to marinate slightly for enhanced flavor, but it’s also delicious cooked immediately.
- Assemble the Foil Packets: Divide the chicken and vegetable mixture evenly among the four prepared foil sheets. Spoon the mixture into the center of one half of each foil sheet, leaving a border around the edges.
- Seal the Packets Tightly: Fold the empty half of the foil sheet over the filling. Carefully crimp the edges together multiple times along all three open sides to create a tightly sealed packet. The goal is to trap the steam inside, which will cook the chicken and vegetables gently and keep them moist. Ensure there are no gaps where steam can easily escape. Leave a little headspace within the packet for steam circulation.
- Cook the Packets (Oven Method): Place the sealed foil packets directly onto a baking sheet (this makes transferring easier and catches any potential minor leaks). Place the baking sheet in the preheated 400°F (200°C) oven. Bake for 25-30 minutes. Cooking time may vary slightly depending on the exact size of your chicken pieces and the efficiency of your oven.
- Cook the Packets (Grill Method): Place the sealed foil packets directly onto the preheated grill grates over medium heat. Close the grill lid. Grill for approximately 20-25 minutes, flipping the packets once halfway through using tongs. Grilling adds a lovely subtle smoky flavor. Be cautious of hot spots on your grill; indirect heat might be preferable if your grill runs very hot.
- Check for Doneness: Carefully remove one packet from the oven or grill using tongs or oven mitts. Cautiously open the packet, being mindful of the escaping hot steam (open it away from your face). Check if the chicken is cooked through (no longer pink in the center, juices run clear) and the vegetables are tender to your liking. The internal temperature of the chicken should reach 165°F (74°C) when checked with a meat thermometer for guaranteed safety. If needed, reseal the packet and return it (and the others) to the oven/grill for a few more minutes.
- Rest Briefly: Once cooked, let the packets rest for 2-3 minutes before fully opening. This allows the juices to redistribute slightly within the chicken, resulting in a more tender bite.
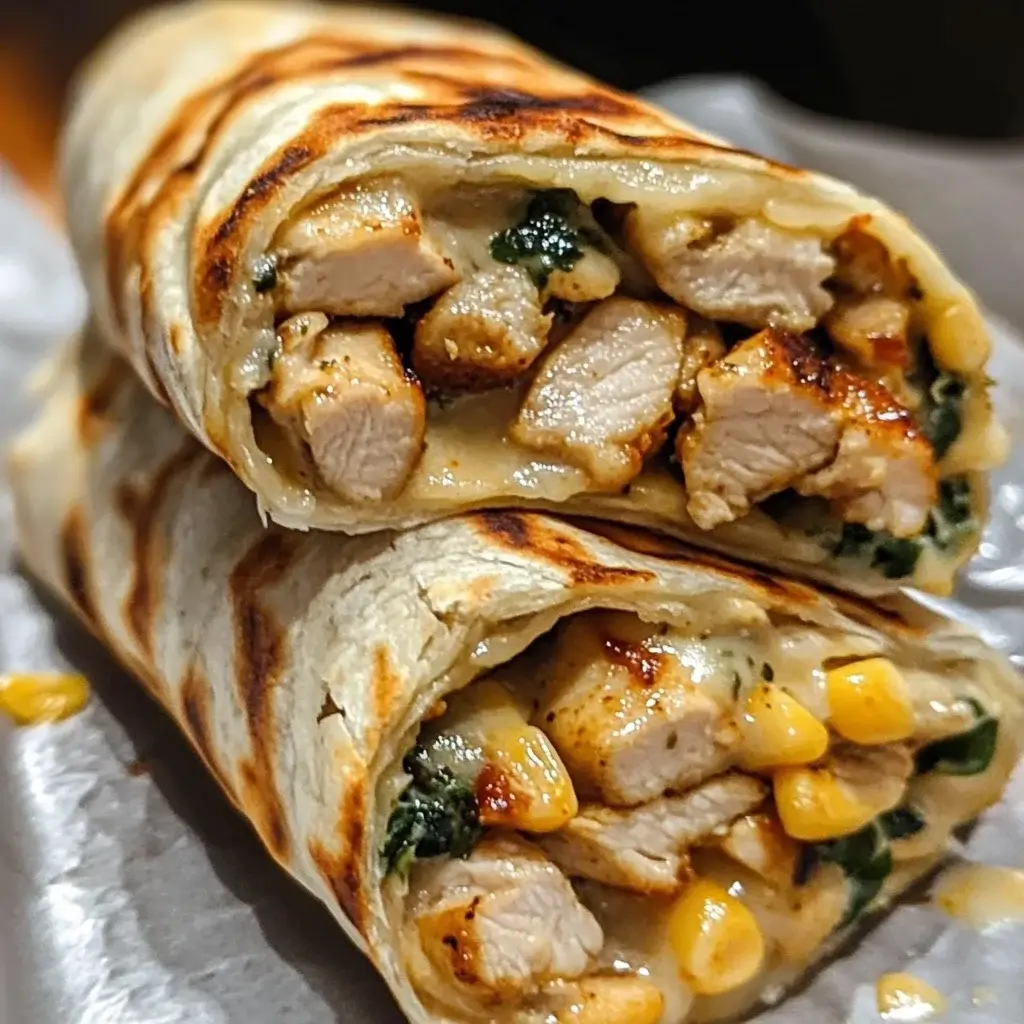
- Serve: Carefully open all the packets (again, watch for steam!). You can serve the contents directly from the foil, or spoon the garlic chicken and vegetable mixture onto warmed tortillas. Garnish with your favorite toppings like fresh cilantro, a dollop of Greek yogurt or sour cream, salsa, or a squeeze of fresh lime juice.
Nutrition Facts
Understanding the nutritional profile helps you fit this delicious meal into your dietary goals. Please note that these values are estimates and can vary based on specific ingredients used (like the type of oil, size of chicken pieces, actual wrap chosen) and exact portion sizes.
- Servings: This recipe yields approximately 4 servings.
- Calories Per Serving: Roughly 450-550 calories per serving before adding the wrap and toppings. A standard flour tortilla adds approximately 150-200 calories, and toppings vary significantly.
- Protein (Approx. 35-40g per serving): Primarily from the chicken breast, protein is crucial for muscle building and repair, immune function, and providing a feeling of fullness (satiety), which can help with weight management.
- Fiber (Approx. 5-7g per serving): Sourced from the onions, bell peppers, and zucchini. Dietary fiber is essential for digestive health, helping to regulate bowel movements and contributing to heart health by potentially lowering cholesterol levels.
- Healthy Fats (Approx. 20-25g per serving): Mostly unsaturated fats from the olive oil. These fats are important for hormone production, nutrient absorption (like vitamins A, D, E, K), and overall cellular health. Choosing extra virgin olive oil provides additional antioxidants.
- Vitamin C (Significant Source): Bell peppers, especially red ones, are packed with Vitamin C, a powerful antioxidant that supports the immune system, skin health, and wound healing.
- Sodium (Variable): Primarily from the added salt. The estimate assumes 1 tsp of salt for the whole recipe (approx. 600mg sodium per serving). Adjust salt according to your needs and preferences. Be mindful of sodium in chosen wraps and processed toppings.
Preparation Time
This recipe is designed for convenience, making it perfect for busy schedules. Here’s a breakdown of the time involved:
- Active Preparation Time: Approximately 20 minutes. This includes washing and chopping the vegetables, cubing the chicken, mincing the garlic, measuring seasonings, and assembling the foil packets. Your speed might vary based on your knife skills and familiarity with the process. Using pre-cut vegetables can reduce this time further.
- Cooking Time: Approximately 25-30 minutes in the oven or 20-25 minutes on the grill. This is largely hands-off time while the packets cook.
- Total Time: Approximately 45-50 minutes from starting prep to having the cooked packets ready to serve. This makes it a feasible and satisfying weeknight dinner option. Add a few extra minutes for warming tortillas and setting out toppings.
How to Serve
Serving these Garlic Chicken Wrap Packs is half the fun! The versatility allows for various presentations and flavor combinations. Here are some ideas:
- Classic Wrap Assembly:
- Warm your chosen tortillas (flour, whole wheat, corn, low-carb, gluten-free) briefly in a dry skillet, microwave, or directly over a gas flame for pliability.
- Carefully open a foil packet (beware of steam!).
- Spoon a generous portion of the hot garlic chicken and vegetable mixture down the center of a warm tortilla.
- Drizzle some of the flavorful juices from the packet over the filling.
- Add your desired toppings (see list below).
- Fold in the sides of the tortilla slightly, then fold up the bottom and roll tightly to enclose the filling.
- Deconstructed Bowl Option:
- For a lower-carb or gluten-free alternative, skip the wrap entirely.
- Spoon the contents of a foil packet into a bowl.
- Top generously with your favorite garnishes and sauces.
- Serve as is, or alongside a bed of greens, quinoa, cauliflower rice, or brown rice.
- Family-Style Platter:
- Open all the foil packets and carefully transfer the contents (including juices) to a large serving platter.
- Arrange bowls of various toppings and a stack of warm tortillas nearby.
- Allow everyone to build their own wraps or bowls according to their preferences. This is great for gatherings or families with different tastes.
- Suggested Toppings & Accompaniments:
- Cool & Creamy: Sour cream, plain Greek yogurt (a healthier alternative), tzatziki sauce, avocado slices or guacamole.
- Fresh & Zesty: Chopped fresh cilantro or parsley, shredded lettuce or spinach, diced tomatoes, thinly sliced green onions, pickled red onions, a squeeze of fresh lime or lemon juice.
- Spicy Kick: Sliced jalapeños (fresh or pickled), your favorite hot sauce, red pepper flakes sprinkled on top.
- Cheesy Goodness: Crumbled feta or cotija cheese, shredded Monterey Jack, cheddar, or a Mexican blend cheese.
- Sauces: Mild, medium, or hot salsa; pico de gallo; chipotle aioli.
- Side Dish Pairings:
- While the packets are quite complete, you could add:
- A simple side salad with vinaigrette.
- Mexican street corn salad (Esquites).
- Black beans or refried beans.
- Spanish rice or cilantro-lime rice.
- Tortilla chips with salsa and guacamole.
- While the packets are quite complete, you could add:
Additional Tips
Elevate your Garlic Chicken Wrap Pack experience with these helpful tips:
- Marinate for Maximum Flavor: While delicious cooked immediately, letting the chicken and vegetable mixture marinate in the oil and seasonings for at least 30 minutes (or up to 4 hours) in the refrigerator before assembling the packets allows the flavors to penetrate more deeply, especially into the chicken.
- Invest in Heavy-Duty Foil: This cannot be stressed enough. Heavy-duty foil is significantly less likely to puncture or tear, preventing precious juices and steam from escaping. If you only have regular foil, use two layers per packet for added security.
- Don’t Overcrowd the Packets: Ensure you divide the mixture evenly among the four packets. Overfilling can lead to uneven cooking – some parts might be steamed while others are essentially boiled, and cooking time will increase. If you have a lot of filling, make an extra packet or two.
- Uniform Cutting is Key: Cut the chicken into similar-sized cubes (around 1-inch) and try to keep vegetable slices relatively uniform in thickness. This ensures everything cooks through at roughly the same rate, preventing undercooked chicken or mushy vegetables.
- Master the Seal: Crimp the edges of the foil tightly several times. A good seal traps steam, which is essential for cooking the food gently and keeping the chicken incredibly moist. Fold the edges over at least twice.
- Customize Your Veggies: Feel free to swap or add vegetables based on preference or what’s in season. Broccoli florets, cauliflower florets, mushrooms, cherry tomatoes (added halfway through), sliced carrots (cut thinly), or asparagus spears all work well. Adjust cooking time slightly for harder vegetables like carrots.
- Embrace the Grill: Cooking these packets on the grill imparts a wonderful smoky flavor that you can’t quite replicate in the oven. Use medium heat and consider placing packets on the upper rack or over indirect heat if your grill runs hot, to prevent scorching the bottom. Remember to flip them halfway through.
- Meal Prep Potential: These packets are fantastic for meal prep. You can assemble the uncooked packets and store them in the refrigerator for up to 24 hours before cooking. Alternatively, cook the packets fully, let them cool, and store them (still sealed or transferred to airtight containers) in the fridge for up to 3-4 days. Reheat gently in the microwave, oven, or skillet. Assemble wraps just before serving for the best texture.
FAQ Section
Here are answers to some frequently asked questions about making Garlic Chicken Wrap Packs:
- Can I use chicken thighs instead of breasts?
Absolutely! Boneless, skinless chicken thighs work wonderfully in this recipe. They are generally more forgiving than breasts and stay juicier due to their slightly higher fat content. Cut them into similar 1-inch pieces. You might need to add a couple of extra minutes to the cooking time, always checking for an internal temperature of 165°F (74°C). - Can I prepare these foil packets ahead of time?
Yes, this is one of their great advantages! You can fully assemble the uncooked packets (chicken, veggies, oil, seasoning sealed in foil) and store them flat in the refrigerator for up to 24 hours. When ready to eat, just take them out and bake or grill as directed. This is perfect for busy weeknights or prepping for a camping trip. - Is this recipe spicy?
As written, the recipe is savory and flavorful, not spicy. The primary flavors are garlic, oregano, and smoked paprika. If you enjoy heat, feel free to add 1/4 to 1/2 teaspoon of red pepper flakes, a pinch of cayenne pepper, or some diced jalapeño (seeds removed for less heat) to the chicken and vegetable mixture before sealing the packets. - What if my vegetables are too soft or still too crunchy?
- Too Soft/Mushy: This usually happens if they are cut too small or cooked for too long. Also, ensure you aren’t adding extra liquid beyond the olive oil. Next time, cut veggies slightly larger or check for doneness a few minutes earlier. Zucchini, in particular, can get soft quickly.
- Too Crunchy: This means they likely needed more cooking time or were cut too large, especially denser vegetables. Ensure uniform cutting and check chicken doneness – if chicken is cooked but veggies aren’t, you might need to cut veggies smaller next time or choose quicker-cooking ones. Ensure packets were sealed well to trap steam.
- Can I freeze these foil packets?
Yes, you can freeze the uncooked, assembled foil packets. Seal them tightly and place them in freezer bags (for extra protection against leaks or odor transfer) for up to 2-3 months. Thaw them completely in the refrigerator overnight before cooking as directed. Note that the texture of some vegetables (like zucchini) might change slightly after freezing and thawing, becoming a bit softer. Freezing cooked packets is possible but may result in drier chicken and softer veggies upon reheating. - What are some other seasoning variations I could try?
Get creative! Instead of oregano and paprika, try:- Italian: Use Italian seasoning blend, maybe add some sun-dried tomatoes (oil-packed, drained).
- Mexican: Use chili powder, cumin, and a pinch of coriander. Add corn and black beans (rinsed and drained). Serve with lime and cilantro.
- Lemon Herb: Use dried thyme and rosemary, add lemon zest to the mix, and squeeze fresh lemon juice over before serving.
- Cajun: Use a store-bought or homemade Cajun seasoning blend (adjust salt accordingly). Add andouille sausage slices.
- My foil packets leaked! What did I do wrong?
Leaks usually happen for a few reasons: using regular (not heavy-duty) foil, puncturing the foil accidentally (e.g., with sharp edges of chicken bones if using bone-in, though this recipe uses boneless), or not sealing the edges tightly enough. Always use heavy-duty foil, handle packets carefully, and make sure to fold and crimp the edges securely at least twice. Placing packets on a baking sheet in the oven helps contain any minor leaks. - How do I make this recipe lower in carbs or keto-friendly?
This recipe is easily adaptable!- Choose lower-carb vegetables: Stick with bell peppers, onions, zucchini. Consider adding mushrooms, broccoli, or cauliflower. Avoid higher-carb additions like potatoes or corn.
- Be generous with olive oil or use avocado oil.
- Ensure chicken thighs (higher fat) could be an option if desired.
- Skip the traditional tortilla wrap. Serve the filling in lettuce cups (butter lettuce or romaine work well) or over cauliflower rice or zucchini noodles.
- Choose low-carb toppings like cheese, sour cream, avocado, and low-sugar salsa.

Garlic Chicken Wrap Packs
Ingredients
Here’s what you’ll need to create these delicious and convenient Garlic Chicken Wrap Packs. Each ingredient plays a vital role in building layers of flavor and texture.
- 1.5 lbs Boneless, Skinless Chicken Breasts: The lean protein base of our dish. Cut into uniform 1-inch cubes ensures even and quick cooking. You can also use chicken thighs for a richer flavor, though cooking time might need slight adjustment.
- 6–8 Cloves Fresh Garlic: The star of the show! Minced finely to release maximum aromatic flavor throughout the packets. Don’t skimp here; the garlic mellows beautifully as it roasts. Adjust amount based on your love for garlic – use less for a milder taste, more for a pungent kick.
- 1 Large Red Onion: Sliced thinly. Adds a touch of sweetness and depth as it cooks down. Yellow or white onions work well too.
- 1 Red Bell Pepper: Seeded and sliced. Provides vibrant color, a slight sweetness, and essential vitamins. Any color bell pepper (yellow, orange, green) can be substituted or added.
- 1 Green Bell Pepper: Seeded and sliced. Complements the red pepper with a slightly less sweet, earthier flavor profile.
- 1 Medium Zucchini: Sliced into half-moons (about 1/4-inch thick). Adds moisture, tenderness, and a dose of green goodness. Yellow squash is a great alternative.
- 1/4 Cup Olive Oil: Extra virgin recommended for flavor. This helps coat the chicken and vegetables, promotes browning, and prevents sticking.
- 1 tablespoon Dried Oregano: Adds a classic Mediterranean herbaceous note that pairs wonderfully with garlic and chicken.
- 1 teaspoon Smoked Paprika: Lends a subtle smokiness and beautiful color to the dish. Sweet paprika can be used if preferred.
- 1 teaspoon Salt (or to taste): Enhances all the other flavors. Start with one teaspoon and adjust as needed. Kosher salt or sea salt is recommended.
- 1/2 teaspoon Black Pepper (freshly ground preferred): Provides a gentle warmth and spice. Freshly ground pepper offers superior flavor.
- Large Flour Tortillas or Wraps (8-10 inch): For serving. Choose your favorite type – whole wheat, low-carb, gluten-free, or classic flour tortillas all work well. Warm them slightly before serving for better flexibility.
- Optional Garnishes: Fresh cilantro or parsley (chopped), sour cream or Greek yogurt, salsa, shredded cheese, avocado slices, lime wedges. These elevate the final wrap.
- Heavy-Duty Aluminum Foil: Essential for creating sturdy packets that won’t leak or tear easily during cooking or handling.
Instructions
Follow these steps carefully to ensure perfectly cooked, flavorful Garlic Chicken Wrap Packs every time. The beauty of this recipe lies in its simplicity and the steaming method within the foil.
- Preheat Oven & Prepare Foil: Preheat your oven to 400°F (200°C). If grilling, preheat your grill to medium heat (around 400°F). Tear off four large sheets of heavy-duty aluminum foil, each approximately 12×18 inches. Lay them flat on your work surface. Using heavy-duty foil is crucial to prevent tears and ensure a good seal, which traps the steam necessary for cooking. If using regular foil, consider double-layering each packet.
- Prepare the Chicken and Vegetables: Ensure your chicken breasts are cut into uniform 1-inch pieces. This consistency is key for even cooking, preventing some pieces from drying out while others are still undercooked. Chop the garlic finely (mincing it releases more flavor). Slice the red onion, red bell pepper, green bell pepper, and zucchini. Try to keep the vegetable slices relatively consistent in thickness so they cook at a similar rate.
- Combine Ingredients: In a large mixing bowl, combine the cubed chicken, minced garlic, sliced red onion, sliced bell peppers (both red and green), and sliced zucchini. Drizzle the olive oil over the chicken and vegetable mixture.
- Season Generously: Sprinkle the dried oregano, smoked paprika, salt, and freshly ground black pepper over the contents of the bowl.
- Toss to Coat: Using tongs or your clean hands, gently toss everything together until the chicken and vegetables are evenly coated with the olive oil and seasonings. Ensure every piece gets some love – this distribution is vital for balanced flavor in each packet. You can let this mixture sit for 10-15 minutes at room temperature (or longer in the fridge) to marinate slightly for enhanced flavor, but it’s also delicious cooked immediately.
- Assemble the Foil Packets: Divide the chicken and vegetable mixture evenly among the four prepared foil sheets. Spoon the mixture into the center of one half of each foil sheet, leaving a border around the edges.
- Seal the Packets Tightly: Fold the empty half of the foil sheet over the filling. Carefully crimp the edges together multiple times along all three open sides to create a tightly sealed packet. The goal is to trap the steam inside, which will cook the chicken and vegetables gently and keep them moist. Ensure there are no gaps where steam can easily escape. Leave a little headspace within the packet for steam circulation.
- Cook the Packets (Oven Method): Place the sealed foil packets directly onto a baking sheet (this makes transferring easier and catches any potential minor leaks). Place the baking sheet in the preheated 400°F (200°C) oven. Bake for 25-30 minutes. Cooking time may vary slightly depending on the exact size of your chicken pieces and the efficiency of your oven.
- Cook the Packets (Grill Method): Place the sealed foil packets directly onto the preheated grill grates over medium heat. Close the grill lid. Grill for approximately 20-25 minutes, flipping the packets once halfway through using tongs. Grilling adds a lovely subtle smoky flavor. Be cautious of hot spots on your grill; indirect heat might be preferable if your grill runs very hot.
- Check for Doneness: Carefully remove one packet from the oven or grill using tongs or oven mitts. Cautiously open the packet, being mindful of the escaping hot steam (open it away from your face). Check if the chicken is cooked through (no longer pink in the center, juices run clear) and the vegetables are tender to your liking. The internal temperature of the chicken should reach 165°F (74°C) when checked with a meat thermometer for guaranteed safety. If needed, reseal the packet and return it (and the others) to the oven/grill for a few more minutes.
- Rest Briefly: Once cooked, let the packets rest for 2-3 minutes before fully opening. This allows the juices to redistribute slightly within the chicken, resulting in a more tender bite.
- Serve: Carefully open all the packets (again, watch for steam!). You can serve the contents directly from the foil, or spoon the garlic chicken and vegetable mixture onto warmed tortillas. Garnish with your favorite toppings like fresh cilantro, a dollop of Greek yogurt or sour cream, salsa, or a squeeze of fresh lime juice.
Nutrition
- Serving Size: one normal portion
- Calories: 200
- Sodium: 600mg
- Fat: 25g
- Fiber: 7g
- Protein: 40g